
My outdoor garden received an abundance of love this 2023 season, now it’s time to give that same love to my indoor plants. Admittedly, since starting my business and putting more effort into my outdoor garden I’ve lost about four houseplants. Someone once told me, “If you aren’t killing at least one of your houseplants while gardening or in general than you’re doing it wrong…” and that has stuck with me as a valid busy person truth!
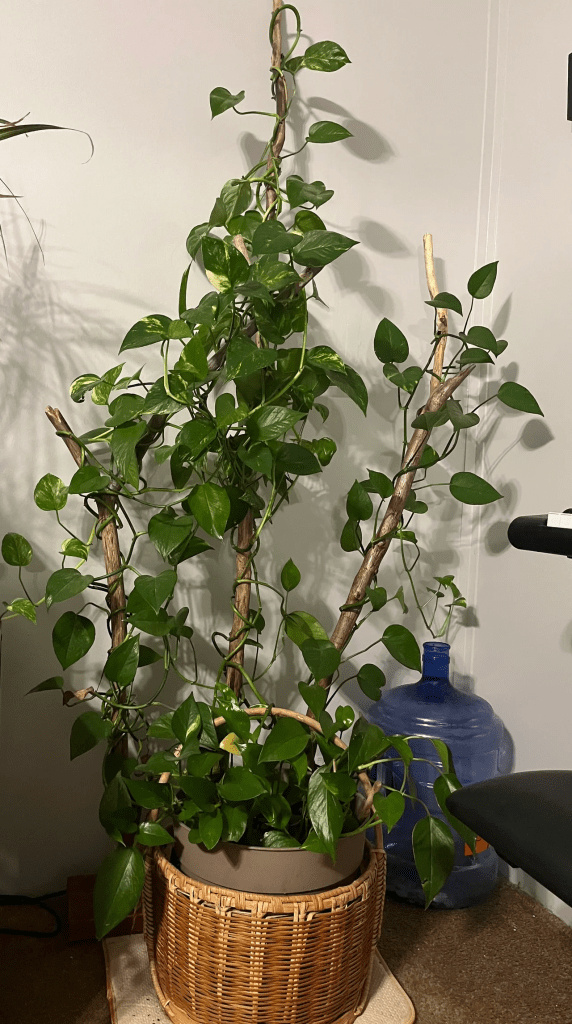
One of my favorite plants that occupy my home is this gifted pothos that came to me at about half the size it is now and has flourished with little maintenance.
Pothos Care:
I follow a semi regular weekly or biweekly watering schedule and have propagated, shared, and lost some of the plant but through resilience, it remains hearty. Once a year, usually in the springtime I’ll wipe down the leaves to ensure they get as much light to them as possible. I received the plant two years ago and have fertilized it once. It did well with bright indirect light and has since been moved to an area of my home that receives less light and has thrived more with less dead leaves in this spot of my house.
It has yet to be repotted but that will happen as soon as it has time to adjust to my home. It’s growing well in its current container but is beginning to outgrow the space with recent propagations added to the same container.
A few months ago, I got an idea to use fallen branches to bring this plant to life. It was one part creativity and one part a need to get rid of the plastic garden stakes that were more a hassle and eyesore than benefit.
To bring my idea to reality, I went to my grandparents’ farm to hunt for fallen tree branches.
The reason behind this method of branch collection was to prevent harm to the trees in my area. Fallen branches typically have already begun the drying process which eliminates the amount of time it will take to complete this project. They live in a well wooded area, so it didn’t take long to find the perfect branches for this project.
The bottoms of the branches were sawed off using a radial table saw to straighten them out. During this part of the process, I was able to gauge the dryness of the branch. The length of branches that I chose gave an opportunity to cut them back to about six feet, four feet, and three feet. This gave the final project dimension and a variety of sizes seemed to be the most aesthetically pleasing. Rough measurements were fine by me in this project because branches in nature are not exact sizes, it gave the project character.
I left the branches on my porch for a few weeks during the summer months (to make sure all bugs found their way out before I brought the branches into my home).
After the branches were dried, I brought them inside and put down an old sheet. In hindsight, it’s best to do this next part outside, but I was working with what I had available.
The branches were sealed all around using a Clear Gloss Poly Crylic sealant.
After the branches were sealed, I used a piece of spare wood measuring about twenty inches wide x 6 inches long and screwed from the bottom of the spare wood into the branch. I put about two screws in each branch given the thickness of the branches.
The spare piece of wood was stained using a brown wood stain that really helped it camouflage with the branches.
Now came the fun part, I was excited to begin wrapping the stems of the pothos around the branches. To do this, I started by laying out the pothos stems and cutting or picking away dead leaves. Once I had a stem laid out, I would slowly wrap the pothos from the bottom of the nearest branch to the top.
This step was repeated for all stems and if there were remnants of a stem once wrapped, I began to take it back down the length of the branch until it was fully wrapped.
I just love the way this looks in my home and have made it a focal point in my home décor. The propagation ease of pothos means that in no time, the branches will be filled with leaves.
Tools Used:
· Drill
· Table Saw
· Screws
· Sealant – Clear Gloss Polycrylic
· Wood Stain
· Wood stain brush
· Paint brush
· Drop cloth or old bed sheet
· Sandpaper (180 – 100 Grit)
Instructions to complete this project:
1. Find fallen tree branches that do not appear to be bug infested and are not fully saturated. It is best to go out to find branches after a few sunny days.
2. Carefully take the bark off the tree branch. Bark can be a place for bugs to hide so it is important to take it out of all crevices and from all areas of the branch.
3. Leave the branches in a dry location for a period of weeks to months depending on the saturation and if the tree is still alive. I left my branches out for about 2 weeks before impatience took over.
4. Sand and stain a board to use as a base for your structure.
5. Use sandpaper to smooth the surface of the branches, for this I used what I had available which ended up being a combination of 100 and 180 grit depending on the area of the branch. It does not to be a tougher grit (60-80) but just enough to reduce imperfections in the wood and smooth any rough surfaces.
6. Use a cloth to wipe down the branch so that it is free of sand shavings.
7. With a small paint brush, apply the sealant to the branches and leave to dry for the recommended time
8. Helpful Hint (I found this next part easiest to do if you lay the branches down and place the board underneath it) Screw the board to the branches until secure, careful not to overdo it as the branches are susceptible to cracking.
9. Lay out your plant and take time to prune any dying leaves
10. Wrap the stems around the branches from bottom to top and then back down the branch if there is remaining stem.
11. Marvel at your masterpiece!
